The user guide section is intended for users who are tasked with maintaining hierarchies in the data harmony tool. Data stewards and business experts who are familiar with the domain they manage in the tool and need to create, update and manage the items in the hierarchy.
Users should work in collaboration with the data harmony administrator to setup the hierarchy under management and assure the hierarchy attributes and related data is configured as needed.
Single Pane vs Dual Pane
The data harmony functionality can be divided between operations that lend themselves to working in the single pane mode vs operations that require leveraging the dual pane mode. In the single pane mode, users can create new items, edit existing items and their attribute values, delete items and groups, define masters, search, and filter to observe hierarchy sections and browse the hierarchy data.
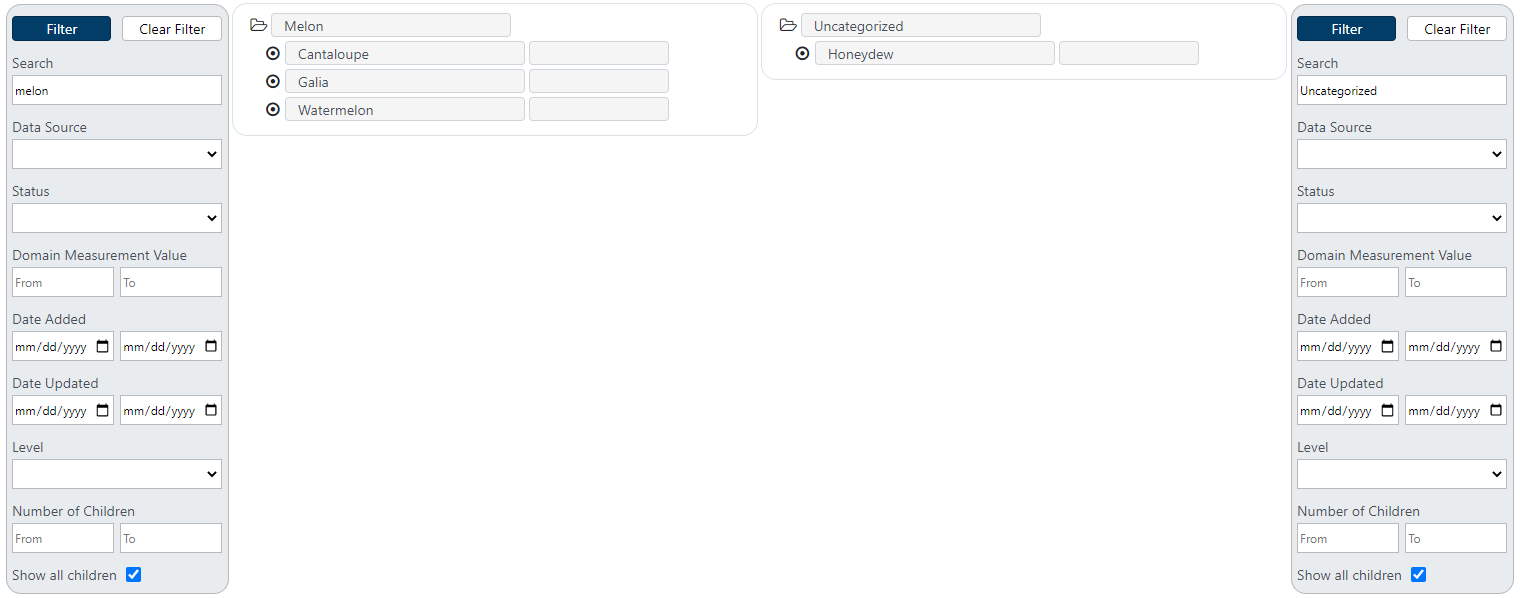
In single pane mode there is one search box on the left side, and the icon next to the domain name indicates that clicking on it will switch the screen to the dual pane mode. In the dual pane mode, you will see two filter boxes, one on each side of the screen, and two hierarchies will appear next to each search box, allowing you to apply different filters to each pane.
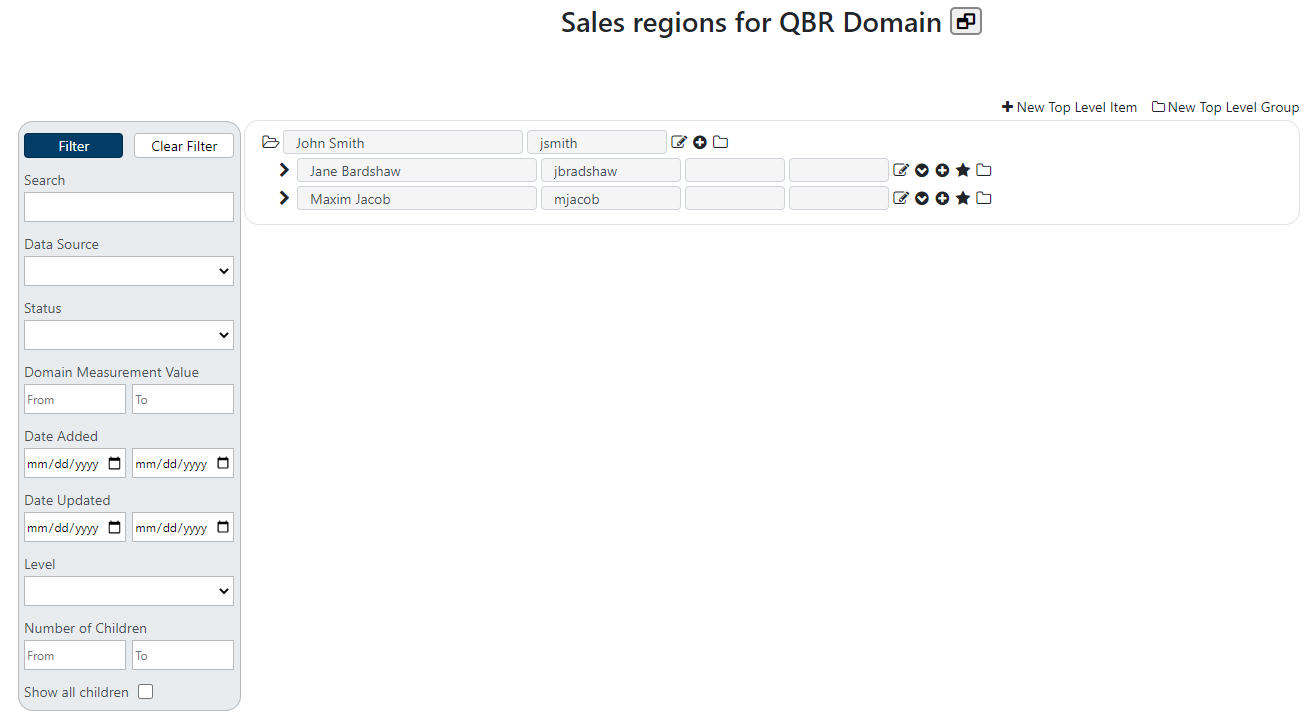
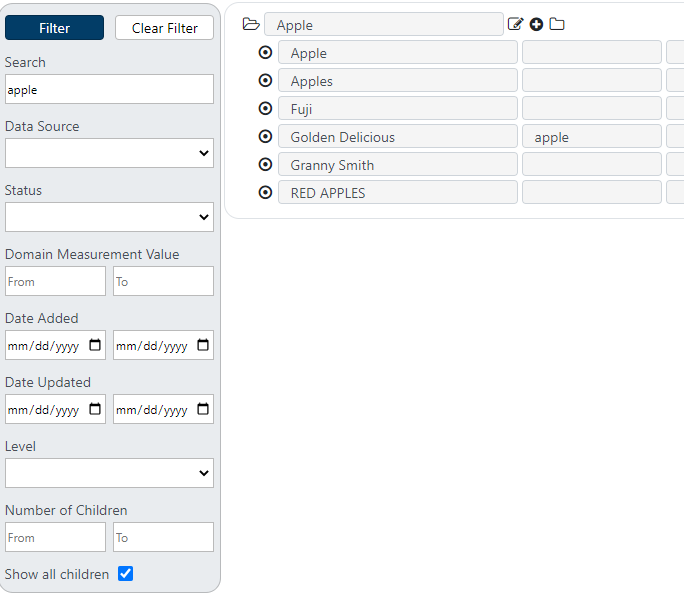
Single pane example:
Dual pane example:

Single Pane mode
The single pane mode is the default screen mode you see when you access a domain. You will use the single pane mode for all hierarchy management operations except for moving items or groups between and across parents and levels.
Creating items and folders
To create a new folder (group) or item at the top level of the hierarchy, use the “New Top Level Item” or “New Top Level Group” at the top right corner of the screen.

When starting a new hierarchy, the first operation would be the create a top-level item or group. For existing hierarchies, new items or groups can be created under existing items or groups, or at the top level of the hierarchy.
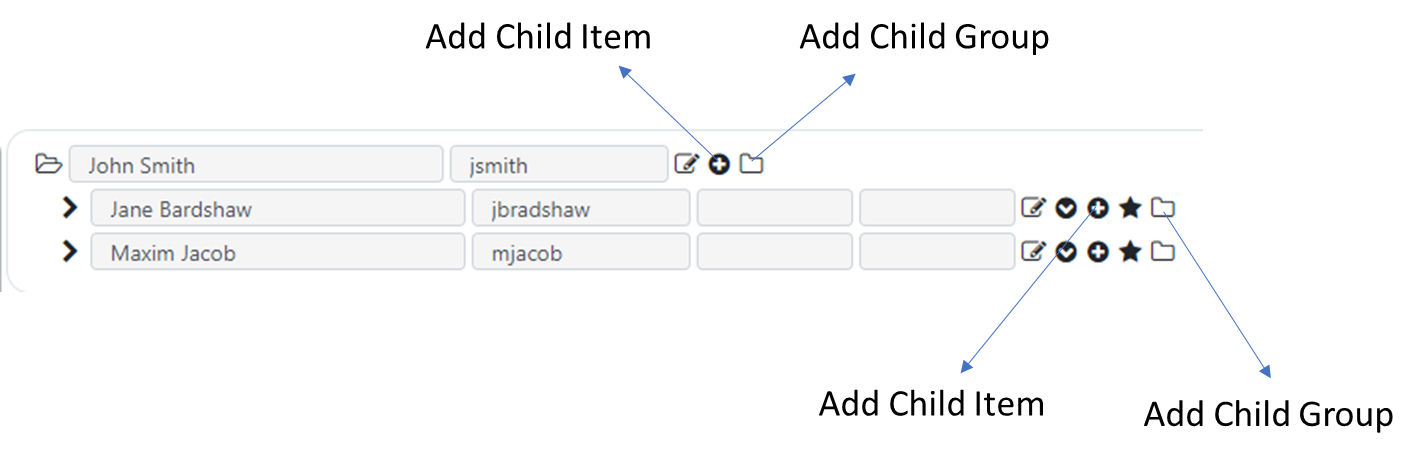
For any existing item or group, you will use the “Add Child Item” or “Add Child Group” icons next to the group or item under which you like to add the new entry.
When you mouse over each of the icons on the screen, a helpful tooltip will indicate the button operation as well.
To determine whether you should use Items or Groups, you should consult your data harmony application administrator. You can also refer to the Groups vs Items section of the Admin Guide for more information on this topic.
Updating and viewing attributes
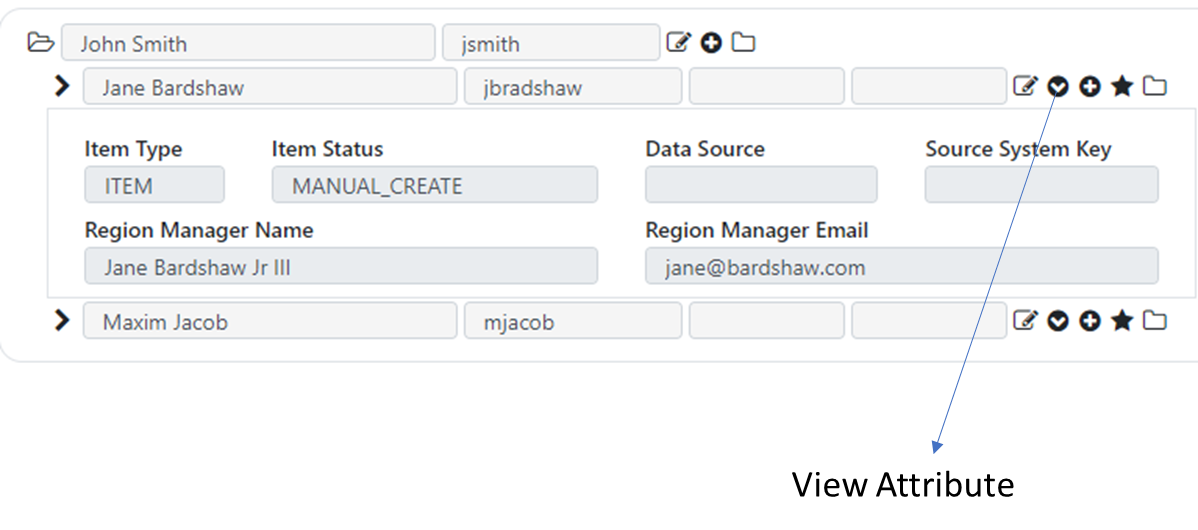
Items in your hierarchy may be configured by the application administrator to include additional attributes. When items have additional attributes available for viewing and editing, you can view them by selecting the “View Attributes” icon next to the item. You can click the View Attribute icon to toggle the display of the item attributes under the item.
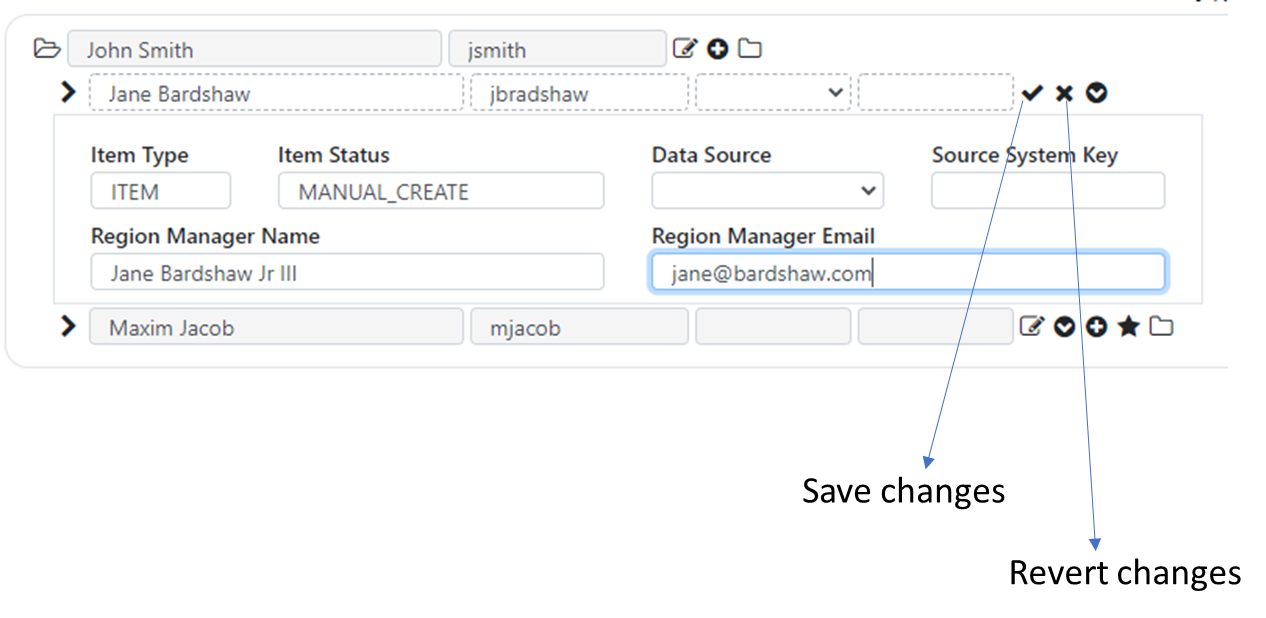
To edit an item and/or it’s attributes, select the “Edit” icon. If the item attributes are displayed, selecting the Edit icon will enable editing both the item and its attributes. If the item attributes view is collapsed, selecting the Edit icon will allow you to edit the item only, and not its attributes.
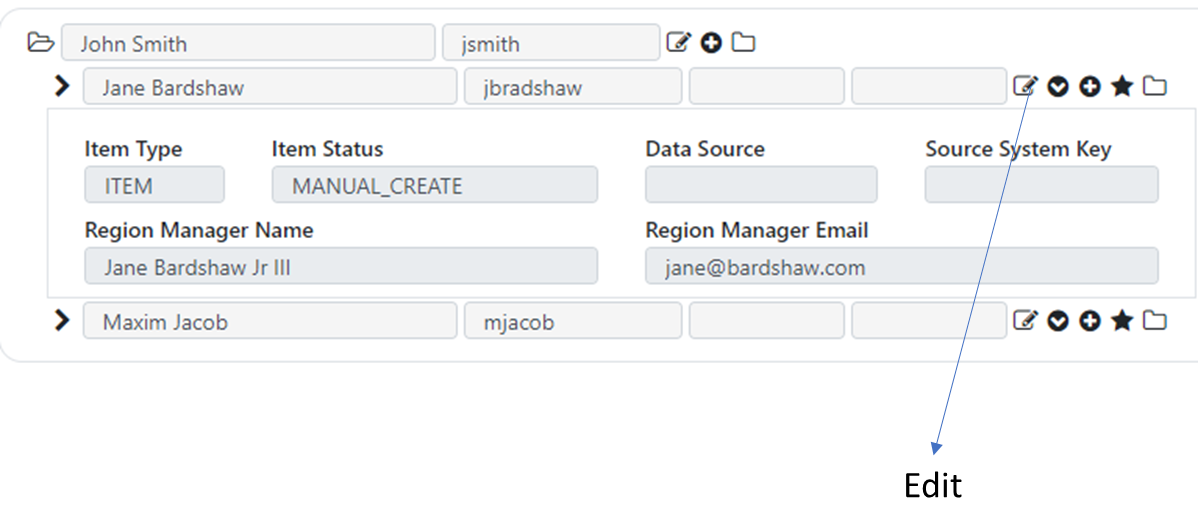
After selecting the Edit option and making your changes, you can save the changes by selecting the checkmark icon, or revert the changes by selecting the x button.
Attributes are setup and managed by the application administrator, so you may consult your application administrator on which attributes should be setup, how they should be displayed on the screen, and whether they should be editable and other options.
Mastering items
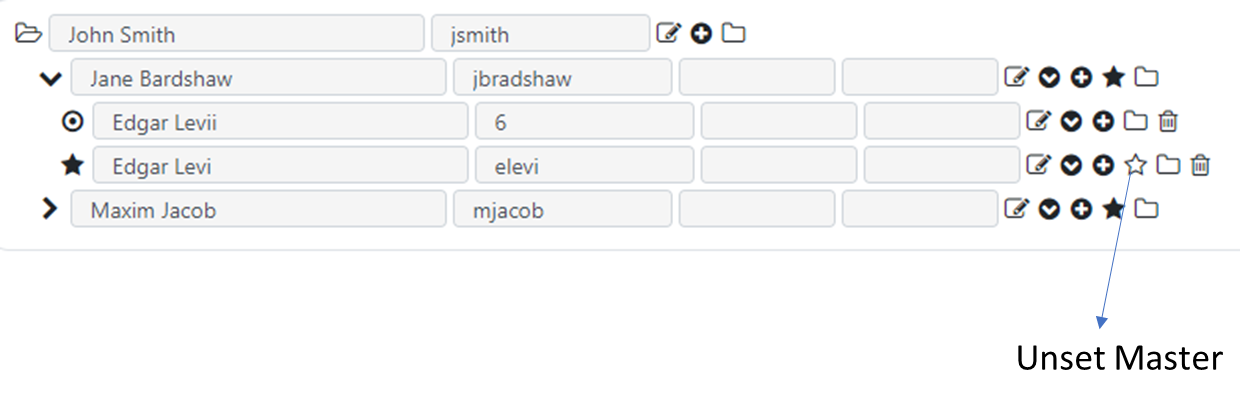
If you are using the hierarchy to master items within parent groups or items, you can use the “Set Master” icon to note a hierarchy item within a parent as a master item.
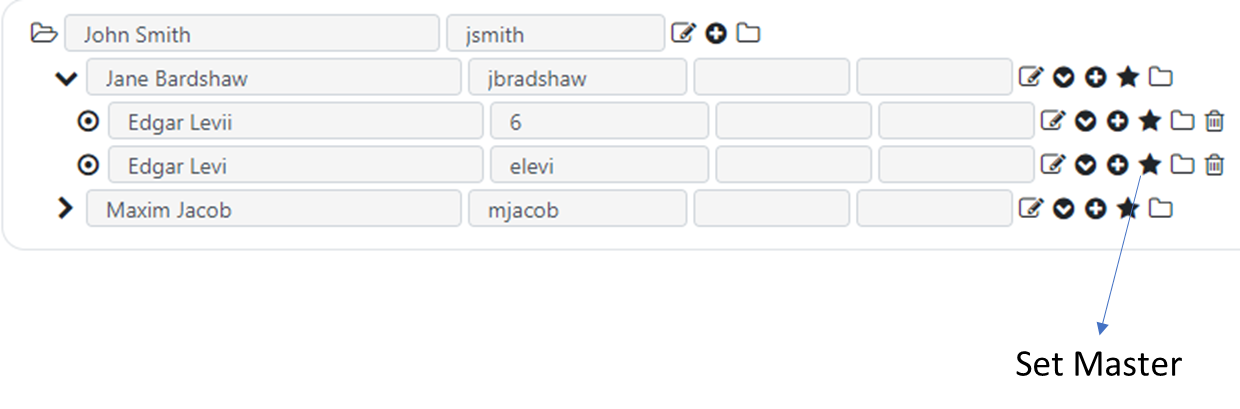
Items set as master will have a star icon to their left. To unset a master item designation from an item, you can click the “Unset Master” icon next to the master item.
Browsing and pagination
Data Harmony will display 100 parent items on a page. If your hierarchy is longer then that, you can use the pagination icons at the button of the screen to browse to additional pages. You may browse to the bottom of the screen to see the pagination icons.

Traversing hierarchy
You can traverse and browse an existing hierarchy by clicking the various icons that represent different types of hierarchy items. Groups are represented by folder icon to the left of the name. When a group icon is greyed out, it means the folder is empty. A trash icon will appear next to an empty folder indicating it may be deleted.

A folder that contains items will not have a trash icon next to it and cannot be deleted until it is empty.
A single click on the folder icon to the left of the name will toggle the folder and expand or collapse it to show or hide items within the folder.
Items with children in them will have a right facing or down facing arrow icon to the left of the name to indicate they can be expanded or collapsed.
Master items, indicated with a star, do not change the icon when they contain children items, but the star icon can be clicked on to expand or collapse the mastered item if it has child items.

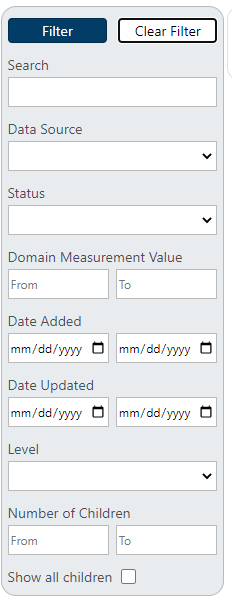
Using Filters
Using filters, you can search for specific parts of the hierarchy, or find specific items to help understand various issues. The various filter options allow searching for different criteria. Search filters are always combined in an “and” fashion, so if you search for items containing the word “apple” and add a filter criteria of Date Added after 1/1/2020, then only items containing the word apple that were added after 1/1/2020 will be displayed.
Here are some common examples of filters usage:
The Search box allows searching for an item by name or its source system id (item identifier). The search is case insensitive and will search for all text.
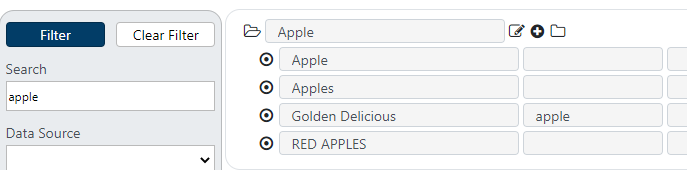
In the example above, only items that match the search criteria were retrieved. However, in some cases, it is important to see all children within a parent who is searched for. Using the “Show all children” checkbox will retrieve all "siblings" of the items found during the search.
The Date Added filter is typically used to help identify new items added since the last time the hierarchy data was reviewed. As administrators automate the integration of new items into a hierarchy from various data sources, users can search for new items added since the last time they reviewed the hierarchy. For example, the hierarchy might be updated once a week on Tuesday night, so users can review items on Wednesday mornings added since last Tuesday.
Dual pane mode
The dual pane mode allows users to move groups or items to other locations in the hierarchy. Separate filters can be used to find sets of items in the left and right panes and move items between them using drag and drop operations.
Using dual filters
The filter on each side of the dual pane can be used completely independently to search for items on that pane. This allows for great flexibility and maneuverability when looking to move items in the hierarchy.
Drag and drop operations
To move items between different parents, click the item or group you would like to move and drag them on top of the name of the item or group you would like to move them into.

To move an item to the top level of the hierarchy, drag it to the “Move To Top Level” label that appears above the hierarchy panel.

Admin guide
Administering the data harmony tool involves managing the application access by allowing users to view or manage hierarchy domains, creating domains to enable users mastering of hierarchies, advising users on technical and data aspects of domain management, and supporting hierarchy data integration scenarios. We recommend the data harmony administrator have strong familiarity with relational databases and SQL concepts, as well as good overall technical expertise with managing software applications.
Users Management
Administrator can create and manage users by adding, editing and assigning permissions to the application users.
Admin account
As described in the application installation guide, the data harmony application installs a single admin account. Upon initial login, it is highly recommended for the application administrator to change the admin account password, and then create additional accounts as needed. It’s typically advisable to create a user account for the application administration and use that account for further administering the application, as opposed to continuously using the admin account.
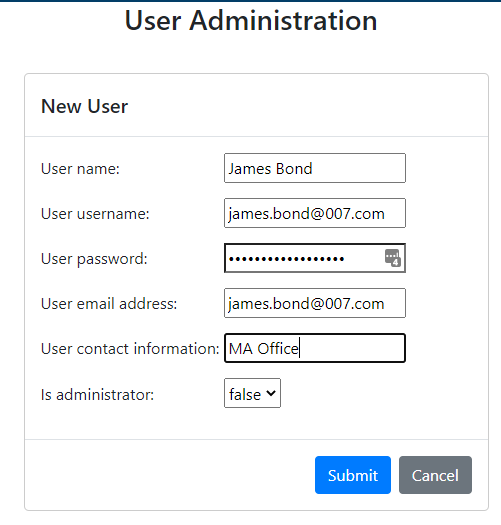
Creating new user
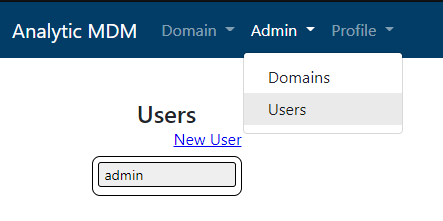
New users can be created by the administrator from the Admin menu by selecting Admin -> Users and then selecting the New User option.
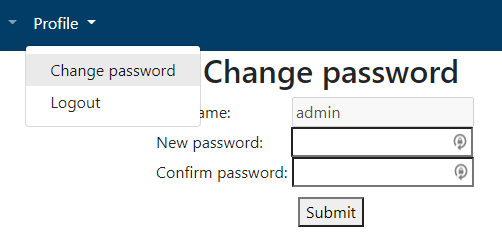
The new user dialog will appear and you will be able to enter the various details for the user. As an administrator, you will choose an initial password for the user, and direct them to change their password once they login (using the Profile-> Change Password option).
To make a change to user information, including changing their password (in case they needed to reset their password for example), you can select the user from the list and choose Edit.

To confirm and save changes made to a user, click the checkmark next to the User Id.

Assigning user to domain
Users can be assigned read only or update privileges to each domain. Assignment of domains to user is managed after the initial user creation from the Edit user dialog.

Domain management
The application administrator is responsible for creating, editing and setting up domains. If a different user then the application administrator is assigned to manage the data domain and act as the domain data steward, it’s advisable for the administrator to work in concert with the domain data steward to assure optimal setup and a good match between the domain setup and the desired outcome for the hierarchy/integration.
Creating and editing domains
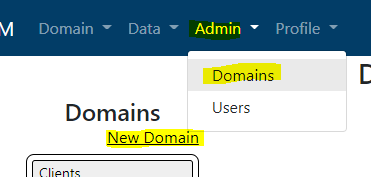
To create a new domain, select the Domain option from the Admin menu and then select New Domain.
The Domain name is a user friendly name that can be modified as needed to articulate the subject area being addressed. The Domain identifier is used to identify the domain in back office operations and should remain unchanged. You may also select between a ragged or a fixed hierarchy. More on that in the Fundamental hierarchy concepts section.

Once the domain is created it can be edited from the Admin Domains menu. More on attributes management for the domain in the next sections.
Creating and editing attributes
Each domain can have additional attributes managed for additional data enrichment for items in the domain. The administrator can create attributes for the domain. For example, a customer hierarchy can include customer address attributes, a personnel domain can include email attributes, etc.
In a given domain, attributes are assigned to a hierarchy level, so different attributes can be made available for different hierarchy levels. For example, in a product hierarchy, different levels of the product hierarchy may have different attributes applicable to that level. Using attributes across different levels is better applied to fixed hierarchies, where there is more consistency between all items at a given level.
To create a new attribute, select the Domain for which you are adding the attribute from the Domain Admin area, and then select New Attribute.

The Attribute name is a user friendly name that will be visible to the users in the application. Attributes currently can only be made Strings, but additional data types could be made available in the future. The import sequence is important to determine the attribute value position when setting up automated data loads. It must be unique across all attributes in a given domain (no two attributes within a domain can have the same import sequence).
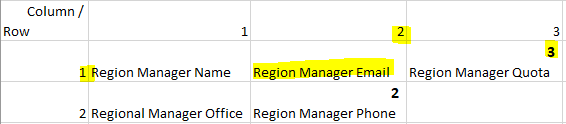
The Column, Row and Row column format define the layout for displaying the attribute on the application screen. The Row column format specifies the total number of columns that will exist in the row where the attributes will be displayed. The Row specifies the row in which the attributes will be displayed, and the Column determines the column position. For example:
The New Attribute illustrated in the image above will be used to position the Region Manager in the second column out of three columns in the first row:
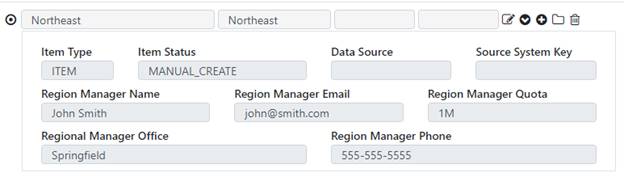
In the application, this setup will translate to a screen layout as follow:
Data import
In addition to manually entering data into a domain, administrators can also import data into an existing domain using the Import functionality. To import a file for a new domain, an administrator should follow these steps:
1. First, make sure the domain for which data is to be imported is defined, and all attributes for the domain are also defined at all hierarchy levels.
2. Next, to simplify the import file layout example, it’s recommended to manually create one leaf node in the hierarchy with all its parents and all the attributes populated. This will assure that when exporting the hierarchy, all columns are populated with example data and are easy to understand in the export example.
3. Next, using the Export option from the Data menu export the example.

4. Once exported, use the export file to create a new file with the same columns as the export file to use in the Import process.

5. Use the Data Import, under the Export function, option to import the file.
For an existing domain, the domain can be exported in whole and the export file can be used to model the import file.
Data sources management
At this time, the application does not include a web interface for setting up automated incremental updates, and those need to be setup manually, following the procedure outlined below.
Automate incremental data updates
At this time, the application does not include a web interface for setting up automated incremental updates, and those need to be setup manually, following the procedure outlined below.
Import process setup
For each data source that is to be automatically run, a row must exist in the import_process table. To setup an import process row, the following needs to be entered in the table in a new row:
Make sure the domain_id and data_source_id are the ones you are setting the import process for.
The query field sould contain the sql query text for the query that will retrieve the data for the import. We recommend creating a database view to select the data and making this query simple, to avoid issues related to long and complex query strings in this field. For example: select * from sap_customers_incremental_data
The schedule_frequency_cd can be set to one of three values: DAILY, WEEKLY, MONTHLY
The schedule_frequency_qual field should be set according to the schedule_frequency_cd as follow:
• For daily - HH:MM (24 hour. For example: 22:30 = every day at 10:30 PM)
• For weekly – DDD:HH:MM (for example: WED:5:30 = Wednesdays 5:30 AM)
• For monthly – dd:HH:MM (for example: 1:18:30 = First day of the month, 6:30 PM)
It is also possible to configure multiple schedule frequencies for a single frequency code by entering them together with commas to separate each value. For example: 9:00,12:00,15:00,18:00 for a DAILY frequency, will run the job daily at 9, noon, 3 and 6.
Source data development guideslines
Data sources for incremental automated loading should follow these guidelines:
The data source should include a “flattened” representation of the hierarchy for which the data is entered. A row should exist for each record at the lowest level of the hierarchy and columns should include each parent level of the hierarchy. For example, to add 2 new sales managers into a two-level sales hierarchy as depicted above in the Sales Region example, the data source should have two rows, with the parent name into which the new child items will be added.
| National Manager | Regional Manager |
|---|---|
| National Manager Name | West |
| National Manager Name | Mid-West |
As for columns development, a set of columns must exist for each level in the hierarchy, and the columns to be included will depend on the type of item to be added to the hierarchy.
For GROUP type items (represented as folders), the following columns must exist:
item_type_cd: this value should be GROUP for group items
hierarchy_level: the hierarchy level for the item, a number (1,2,3, etc..)
name: the name of the item, to be displayed in the application
item_identifier: source key ID, if exists (if not, can create one by using the name, or a hash, etc..)
child_name_regex: regex rule for grouping children into this group
For ITEM type items (represented by a circle if at the lowest level of hierarchy, or an arrow if in the middle of the hierarchy, or as a star if a MASTER item):
item_type: ITEM or MASTER
hierarchy_level: the hierarchy level for the item, a number (1,2,3, etc..)
name: the name of the item, to be displayed in the application
item_identifier: source key ID, if exists (if not, can create one by using the name, or a hash, etc..)
quantity: optional key metric related to this item (for example, sales amount for the customer)
source_system_key: typically equivalent to the item_identifier, or some other source system key to be preserved
attributes: a column for each attribute associated with this hierarchy level, in the order specified by the column_import_sequence value for the attribute in the attribute table.
An example of a query to would be:
select item_type_cd_1, hierarchy_level_1, name_1, item_identifier_1, child_name_regex_1, item_type_cd_2, hierarchy_level_2, name_2, item_identifier_2, quantity_2, source_system_key_2, attribute_value_1, attribute_value_2, attribute_value_3 from mock_data
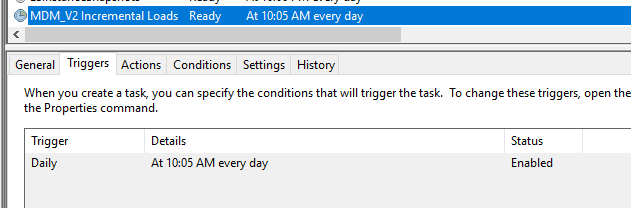
Automated data source scheduling
The final step in scheduling and automating the data sources incremental load would be to setup a windows task scheduler task to trigger the execution of the jobs defined in the import_process table.
This is done by executing the mdmimport-x.jar (x represents version number) jar file on the desired schedule. It is recommended to setup a task scheduler job that executes the jar file. The jar can be executed with the following command: java -jar mdmimport-x.jar
The mdmimport-x.jar file requires an mdm.properties file to reside next to it in the same directory.
In a typical implementation, the mdmimport-x.jar will be placed in the Tomcat conf directory, next to the mdm.properties file to avoid needing to maintain two versions of mdm.properties.
A .bat file can be placed anywhere on the operation system to then run the file and be scheduled from task schedule. An example of the contents of the bat file would be:
cd /D "C:\Program Files\Apache Software Foundation\apache-tomcat-9.0.41\conf"
java -jar mdmimport-1-03.jar
In this example, the bat file explicitly changes the working director to the directory where the mdmimport-x.jar and mdm.properties reside, and then uses java command to execute the jar file.
This bat file can be scheduled with task scheduler on the windows server to run on the schedule needed, for example once a day each day. On each execution, it will scan the import_process table and execute any jobs needed based on the import_process configuration and in consultation with the import_process_log table.
Fundamental hierarchy concepts
To effectively advise application users and properly administer the application, we recommend reviewing and consulting the following concepts, as they will impact the design and maintenance related to different domains and hierarchies.
Fixed and ragged hierarchies
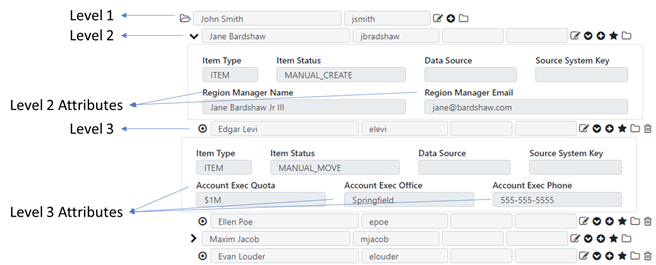
Fixed hierarchies refer to hierarchies where all items at the lowest level terminate at the same level. Every branch of the hierarchy has the exact same number of nodes. Fixed level hierarchies are easy to represent in a tabular “flatten” format, since each column of the flatten hierarchy refer to the same level of the hierarchy. For example:

In this 3-level hierarchy, each lowest level rolls up to a folder, which in turn, rolls up to a folder. This personnel hierarchy, can also be represented in a flatten table like so:
| National Manager | Regional Manager | Account Exec |
|---|---|---|
| John Smith | Jane Bardshaw | Edgar Levi |
| John Smith | Jane Bardshaw | Ellen Poe |
| John Smith | Maxim Jacob | Evan Louder |
Ragged hierarchies do not follow a fixed structure and allow any branch to terminate at a different level. These hierarchies are more complex to traverse and represent in tabular format, since each “column” may represent a different level in the hierarchy. For most business use cases, we recommend using fixed hierarchies and trying to keep all items at the same level, to enable streamlined and simplified reporting and analytics capabilities.
A ragged hierarchy example:

Edgar and Evan are account execs at level 3, and Ellen is at level 2, making it unclear what is their role. In this example, a tabular representation of the data does not include column headers since the data in different columns may mean different things.
| John Smith | Ellen Poe | |
| John Smith | Jane Bardshaw | Edgar Levi |
| John Smith | Maxim Jacob | Evan Louder |
Groups vs Items
Groups and items can both be used as containers, or parents, for children levels in a domain hierarchy. The main difference between the two is the ability to assign attributes. A Group item type cannot be assigned attributes, whereas an ITEM can have attributes.
It’s important to consider whether a parent level in a hierarchy would serve as a container only or could have additional attributes associated with it.
When leveraging a parent level to establish equivalency between child members, there is typically no need to keep attributes at the parent level, and therefore it would be appropriate to use a GROUP item as a parent. This simplifies the hierarchy management and maintenance.
However, if there is a need to keep additional parent level attributes, to resolve disputes between child attributes for example, or for other descriptive needs, use an ITEM as a parent.
Master items
Items can be marked as a special subtype of the ITEM designation, called MASTER. Master items are meant to allow flagging a single child within a level of the hierarchy that resides under one parent. This is useful when needing to integrate multiple source system keys yet retain one of them as the key item to use in reporting, along with all its attributes.
From a reporting perspective, and especially when using a fixed hierarchy that is then flattened for analytics and reporting needs you need to be aware of the implication of using a master item as opposed to managing attributes at the parent level. When joining source system keys at the child level with various source data, as the join will be done at the child item level, attributes of the child considered a master will only apply to records that meet the join criteria, whereas if the attributes are applied to the parent item, then parent attributes can be easily applied to all the children of the parent that meet the join criteria.
Attributes
Attributes can be assigned to any item in the hierarchy. Different sets of Attributes can apply to items at different levels of the hierarchy. This pertains to FIXED hierarchies only, since in a ragged hierarchy, different levels can represent different types of items. For example, in a personnel hierarchy, the manager level items can have attributes such as department under management, and at the employee level that attribute will not apply and therefore will not exist. When flattening fixed hierarchies, such attributes can become important and parent level attributes can be made applicable to all children under a parent.; For example, the manager department name can be applied to all the child employees under that parent name.
Deep linking guide
To support integrated analytics and reporting use cases, data harmony includes a URL API that enables “deep linking”. URLs can be constructed to bring up the data harmony tool screen into a certain state, for example, pass a search criteria for a hierarchy via URL.
URL parameters
The general form for the base URL for deep linking is:
http[s]://[data_harmony_host:port]/mdm/#/mdm/[domain_id]?[search_param_name]=[search_param_value]
In the base URL example, all values in square brackets [] should be replaced by the specific implementation values.
For example, if the data harmony tool is deployed on a test environment/local machine with no changes to tomcat default port (8080) and no ssl implemented (no https, http only), and the use case calls for searching for a customer named Apple in a customer domain which has the domain id of 1, the URL will be:
http://localhost/mdm/#/mdm/1?itemname=apple
All filters options are available in the deep linking API. The following tale includes the mapping of Filter
name in the screen to its corresponding search_param_name
itemname - Search
datasource - Data Source
status - Status
domainvalfrom - Domain Measurement Value (from value)
domainvalto - Domain Measurement Value (to value)
adddatefrom - Date Added (from value)
adddateto - Date Added (to value)
updatedatefrom - Date Updated (from value)
updatedateto - Date Updated (to value)
hierarchylevel - Level
numchildrenfrom - Number of Children (from value)
numchildrento - Number of Children (to value)
showallchildren - Show all children
Multiple search parameters can be combined in a single URL using the standard & sign. For example, to
search for all items called Apple that were added after Dec 31 2020 and include all children, following the
earlier example, the URL would be:
http://localhost/mdm/#/mdm/1?itemname=apple&adddatefrom=2020-12-31&showallchildren=true
Flattened reporting views examples
After setting up a fixed hierarchy, in many cases it is useful to create a reporting view to flatten the hierarchy and expose it in tabular form for reporting, analytics and data integration needs. In a fixed hierarchy, since the number of levels is known, as well as the attributes that are applicable to each level, the item table can be aliased as many times as needed to connect the parent/child items in a flattened manner, and correlated sub queries can be used to get the relevant attribute names and produce a simple flattened view. For example:
The following fixed hierarchy was setup with 3 levels for national manager, regional manager and account executives. The top level of the hierarchy, the national manager, was configured as a group, with no attributes. The regional and account exec levels were setup as items with some attributes
The following SQL example illustrates how this hierarchy can be flattened to a tabular view:
select
/*from level 1 we only get name and mdm id*/
l1.name as national_manager_name,
l1.item_id as national_manager_mdm_item_id,
/*from level 2 we only get name and mdm id as well as source system identifier*/
l2.name as regional_manager_name,
l2.item_identifier as regional_manager_source_id,
l2.item_id as regional_manager_mdm_item_id,
/*correlated subquery used to get the email attribute. the attribute_id value can be obtained freom the
attribute table*/
(select attribute_value from item_attribute_value av where av.attribute_id = 1020 and av.item_id =
l2.item_id) AS regional_manager_email,
/*level 3 follows same pattern, aditional levels can be added as needed..*/
l3.name as account_exec_name,
l2.item_identifier as account_exec_source_id,
l2.item_id as account_exec_mdm_item_id,
(select attribute_value from item_attribute_value av where av.attribute_id = 1022 and av.item_id =
l3.item_id) AS account_exec_office,
(select attribute_value from item_attribute_value av where av.attribute_id = 1023 and av.item_id =
l3.item_id) AS account_exec_phone,
(select attribute_value from item_attribute_value av where av.attribute_id = 1021 and av.item_id =
l3.item_id) AS account_exec_quota
from
item l1
/*the domain identifier_cd is used to identify the hierarchy for which this view is applicable*/
inner join (select * from item where item_id <> parent_item_id and hierarchy_level = 2 and domain_id =
(select domain_id from domain where identifier_cd = 'SALES_REG_QBR')) l2
on l2.parent_item_id = l1.item_id
inner join (select * from item where hierarchy_level = 3 and domain_id = (select domain_id from domain
where identifier_cd = 'SALES_REG_QBR')) l3
on l3.parent_item_id = l2.item_id
where
l1.domain_id = (select domain_id from domain where identifier_cd = 'SALES_REG_QBR')
and l1.hierarchy_level = 1
order by
l1.name,
l2.name,
l3.name

Additional SQL examples
The simple nature of the data model lends itself for working with business users to implement bulk data operations, when operating on large hierarchies. The following examples illustrate some queries that can be used to accomplish bulk operations in certain cases. Please be mindful that manipulating a hierarchy data by executing such queries can have un-intended effects and you must test such changes and be able to refer to a back in case a bulk operation query causes undesirable results.
Deleting items in bulk
Items can be deleted in bulk by deleting rows from the item table. For example, to delete all items that contain the word apple in a product domain with the domain_id of 1, you can use such a query:
delete from item where lower(name) like '%apple%'
Deleting item attribute values in bulk
Item attribute values can be deleted by deleting rows from the item_attribute_value table. For example, to delete the "Color" attribute values which has an id of 2 from a product domain with the domain_id of 1, you can use such a query:
delete from item_attribute_value where attribute_id = 2 and item_id in (select item_id from item where domain_id = 1)
Inserting or updating item attribute values in bulk
Inserting or updating item attribute values can be done by inserting or updating rows in the item_attribute_value table. If a new attribute is added to an existing hirerachy, it might be possible to populate the attribute values with a query without importing a new file or manually updating all items. To insert the new item attribute values, a query such as below can be used. The item_id for which the attribute value is added needs to be known (might require additional querying) as well as the attribute_id which is being manipulated.
insert into item_attribute_value
(
item_attribute_value_id,
item_id,
attribute_id,
attribute_value
)
values
nextval('item_attribute_value_seq'),
123456,
1242,
'Red'
To update the value of an existing item attribute, an update query such as below can be used:
update item_attribute_value
set attribute_value = 'Red'
where item_id = 123456
and attribute_id = 1242
Duplicating a domain
In some cases, duplicating an existing domain can be useful, especially when needing to examine the impact of a significant change on a hierarchy. To duplicate an existing domain you should follow these steps:
1. Define a new domain with a new identifier and name
2. Configure the domain type and attributes to be exactly the same as the domain that is being duplicated. The same number of attributes should exist with the same screen layout, names and applicability to hierarchy levels.
3. Use the Data Export function to export the hierarchy that is to be duplicated.
4. Then, switch to the newly created hierarchy, and use the Data Import to load the data and create an identical hierarchy to the one whose data was exported.
Cleartelligence Data Harmony
Install guide
Typical config
The Cleartelligence Data Harmony tool is typically installed on a single windows server. All components of the application are installed on a single windows node. More advanced configurations can be possible and can be discussed with Cleartelligence.
We recommend a single windows 2016 server or higher, 100 GB of space available for the data harmony application, 16 GB of RAM at a minimum and a quad processor.
Depending on the size of the deployed solution, these minimalistic requirements can be adjusted to boost the performance of higher volume deployments. Additional resources can also be added to the server running the application on an as-needed basis.
Required software
The application requires the following three components to be installed on the windows server:
- Java 8
- Tomcat 9
- Postgres 12 or up
The application has been tested and deployed on tomcat 9 and postgresql 12, future versions that remain backward compatible should have no issues running the application.
Database config
The first step in the application deployment would be generating the required database objects, needed by the application.
We recommend running the mdm application in its own database schema, typically called mdm, owned by a super user.
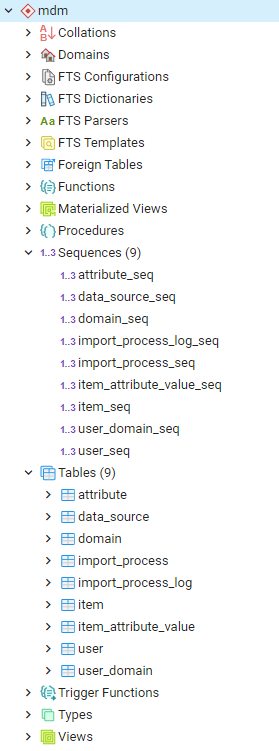
Once the mdm schema is created, the ddl script included in the installation package can be run to generate all needed database objects.
The image below illustrates the schema state after DDL script deployment using PGAdmin 4.
Webapp deployment
The deployment of the webapp includes two parts.
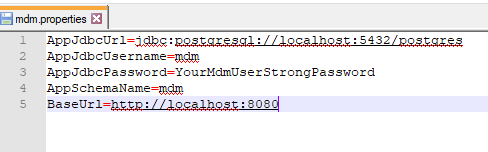
mdm.properties
Copy the mdm.properties file included in the installation package into your tomcat conf directory and modify it to include your database and deployment specific value.
For example:
.war files
Copy the mdm.war and mdmws.war files included in the installation package and deploy them into your tomcat webapps directory
For example:
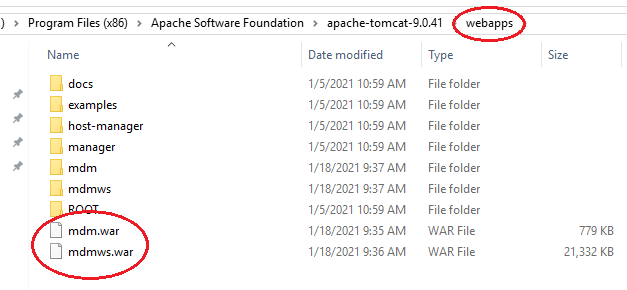
You are now ready to start using the data harmony application! Browse to your base url as defined in the mdm.properties and add /mdm to bring up the initial login screen (for example: if your base url is http://localhost:8080, go to http://localhost:8080/mdm to get started)
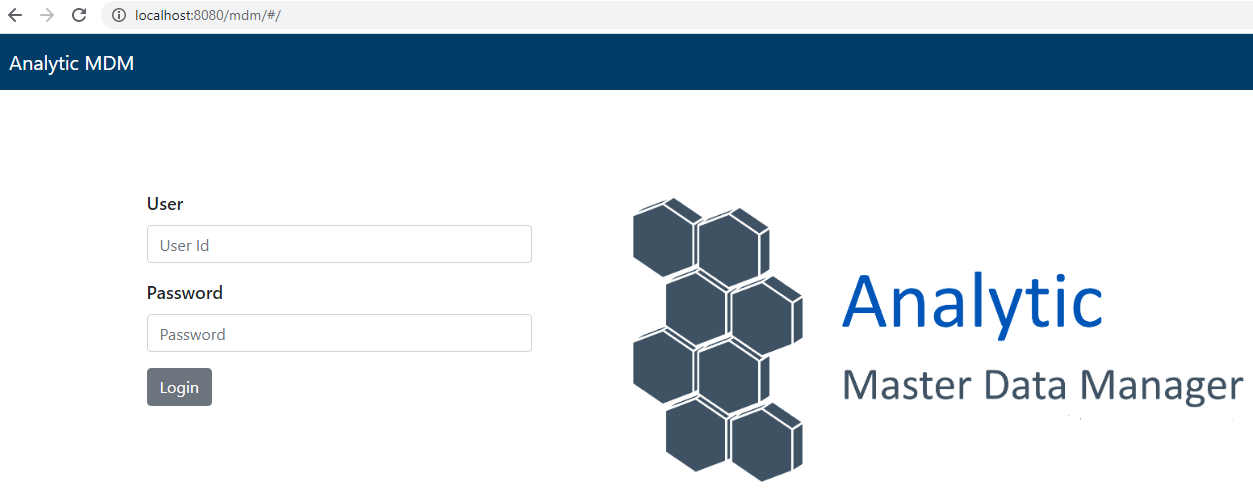
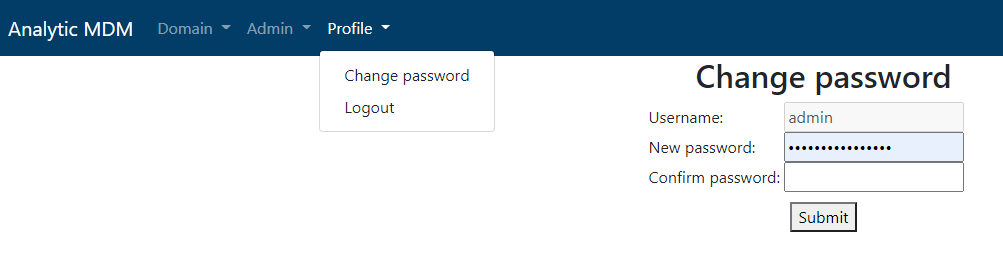
Initial login
The application is installed with a default admin account. You will setup the admin user password by selecting the Change Password option from the Profile menu.
Data model
ERD
The following diagram depicts the key relationships between the data model entities.

Tables
attribute
The attribute table contains all the attributes used on each domain, their main characteristic and screen layout.
| Column Name | Type | Description |
|---|---|---|
| attribute_id | integer | table primary key |
| domain_id | integer | the domain associated with this attribute |
| hierarchy_level | integer | assigns the attribute to a specific level of the hierarchy. Different attribute can be attached to items at different levels. For example, in a sales hierarchy, level 2 might have a quota attribute, or a product attribute, but not level 1 |
| name | text | the name displayed in the application screen for the attribute |
| datatype_cd | text | the database type of the attribute. Currently only String supported |
| column_import_sequence | integer | for data source updates, defines the order in which attribute columns will be arranged in the data source to identify which value should be imported into which attribute |
| row_column_format | text | Defines how many columns should be displayed in the row in which this attribute will be displayed with on the screen |
| form_row | integer | Defines which row the attribute will be displayed in |
| form_column | integer | Define which column in the given row the attribute should be displayed in |
| is_deleted | boolean | soft delete option |
| update_user_id | integer | the id of the user who last updated the record |
| update_username | text | the username of the user who last updated the record |
| update_datetime | timestamp without time zone | the date and time in which the record had been last updated |
| is_updatable | boolean | determines whether users will be allowed to edit the attribute value in the application UI |
data_source
The data_source table contains all the data sources used in the various domains.
| Column Name | Type | Description |
|---|---|---|
| data_source_id | integer | table primary key |
| domain_id | integer | the domain for which the data source pertains |
| name | text | the name of the data source, friendly name displayed in app |
| data_source_identifier | text | the identifier is used to identify the data source for the application administrator and should be unique and unchangeable |
| precedence_order | integer | the order in which data sources are processed |
| is_deleted | boolean | soft delete option |
| update_user_id | integer | the id of the user who last updated the record |
| update_username | text | the username of the user who last updated the record |
| update_datetime | timestamp without time zone | the date and time in which the record had been last updated |
domain
The domain table contains all domain hierarchies used in the tool.
| Column Name | Type | Description |
|---|---|---|
| domain_id | integer | table primary key |
| name | text | the name of the domain, friendly name displayed in app |
| identifier_cd | text | the identifier is used to identify the domain for the application administrator and should be unique and unchangeable |
| is_deleted | boolean | soft delete option |
| update_user_id | integer | the id of the user who last updated the record |
| update_username | text | the username of the user who last updated the record |
| update_datetime | timestamp without time zone | the date and time in which the record had been last updated |
| hierarchy_type_cd | text | define whether the domain is flat or ragged |
import_process
The import_process table contains the automated data source update information for scheduled incremental updates.
| Column Name | Type | Description |
|---|---|---|
| import_process_id | integer | table primary key |
| domain_id | integer | the domain for which the import process pertains |
| data_source_id | integer | the data source for which the import process pertains |
| query | text | the data source query to be executed by the import process |
| is_deleted | boolean | soft delete option |
| update_user_id | integer | the id of the user who last updated the record |
| update_username | text | the username of the user who last updated the record |
| update_datetime | timestamp without time zone | the date and time in which the record had been last updated |
import_process_log
The import_process_log table keeps track of import process jobs and allows monitoring and auditing of jobs status.
| Column Name | Type | Description |
|---|---|---|
| import_process_log_id | integer | table primary key |
| import_process_id | integer | the import process record this row relates to |
| domain_id | integer | the domain this record relates to |
| data_source_id | integer | the data source this record relates to |
| last_executed_datetime | timestamp without time zone | last execution time |
| status_cd | text | status of the execution |
| status_detail | text | additional details about the execution status |
item
The item table contains all the hierarchies items, their main characteristics and their relationships.
| Column Name | Type | Description |
|---|---|---|
| item_id | integer | table primary key |
| parent_item_id | integer | the item id of the parent item for this record. Top level item id would be the same as the item id |
| domain_id | integer | the domain for which the item belongs to |
| data_source_id | integer | the data source from which the item was sourced. Can be null if unknown |
| item_identifier | text | Used to identify the item in the source system where it came from |
| name | text | The name of the item as displayed in the app |
| quantity | numeric | a key measurement related to the item. This can be used to inform the user of an important KPI related to the item in the application, for consideration while managing the domain |
| hierarchy_level | integer | The hierarchy level in which the item resides. Currently, we support 8 levels |
| source_system_key | text | a key identifier for the item in the source key, typically the same as item_identifier |
| item_type_cd | text | defines the item type as an item, a group, or a master |
| child_name_regex | text | regex value to be used to search for matching values in incremental data source loads |
| item_status_cd | text | identifies the way the item was last manipulated, as in MANUAL_MOVE, MANUAL_CREATE, AUTO_ADD_LEVEL, etc. Optional, can be null. |
| is_deleted | boolean | soft delete option |
| add_datetime | timestamp without time zone | the date and time in which the item was created |
| update_user_id | integer | the id of the user who last updated the record |
| update_username | text | the username of the user who last updated the record |
| update_datetime | timestamp without time zone | the date and time in which the record had been last updated |
| item_content_status_cd | text | identifies the way the item was added, as in INTEGRATION, MANUAL_CREATE, MANUAL_EDIT etc. Optional, can be null. |
item_attribute_value
The item_attribute_value table contains the values of each item attribute.
| Column Name | Type | Description |
|---|---|---|
| item_attribute_value_id | integer | table primary key |
| item_id | integer | the item for which the value pertains |
| attribute_id | integer | the attribute for which the value pertains |
| attribute_value | text | the attribute value |
user
The user table contains all the users of the application that have access to it.
| Column Name | Type | Description |
|---|---|---|
| user_id | integer | table primary key |
| name | text | the name of the user |
| email_address | text | the email address of the user |
| username | text | the username that will be used to login to the application |
| contact_information | text | additional contact information can be stored here |
| password_encrypted | bytea | the password to login to the application, encrypted. Can only be generated by the application. |
| is_administrator | boolean | indicates if the user is an administrator with full control in the app, or a regular user |
| is_deleted | boolean | soft delete option |
| update_user_id | integer | the id of the user who last updated the record |
| update_username | text | the username of the user who last updated the record |
| update_datetime | timestamp without time zone | the date and time in which the item was created |
user_domain
The user_domain table defined which domain each application user has access to, and what type of access.
| Column Name | Type | Description |
|---|---|---|
| user_domain_id | integer | table primary key |
| user_id | integer | the user id for which the record pertains |
| domain_id | integer | the domain id for which the record pertains |
| is_read_permission | boolean | determines if the user can view the domain |
| is_update_permission | boolean | determines if the user can edit the domain |
| is_deleted | boolean | soft delete option |
| update_user_id | integer | the id of the user who last updated the record |
| update_username | text | the username of the user who last updated the record |
| update_datetime | timestamp without time zone | the date and time in which the item was created |